Adobe Lightroom is a cornerstone tool for photographers worldwide, offering a robust set of features for photo organization and editing. Whether you’re a beginner aiming to enhancing your photos in Adobe Lightroom by using basic skills or a seasoned photographer looking to refine your workflow, understanding how to leverage Lightroom’s tools can elevate your photos from good to extraordinary. This comprehensive guide will explore essential tips and techniques for editing your photos in Adobe Lightroom, helping you unlock the full potential of your images.
1. Understanding Lightroom’s Interface
Before enhancing your photos in Adobe lightroom , it’s crucial to familiarize yourself with Lightroom’s interface. Lightroom is divided into several modules, but the Library and Develop modules are the most important for photo editing.
Library Module
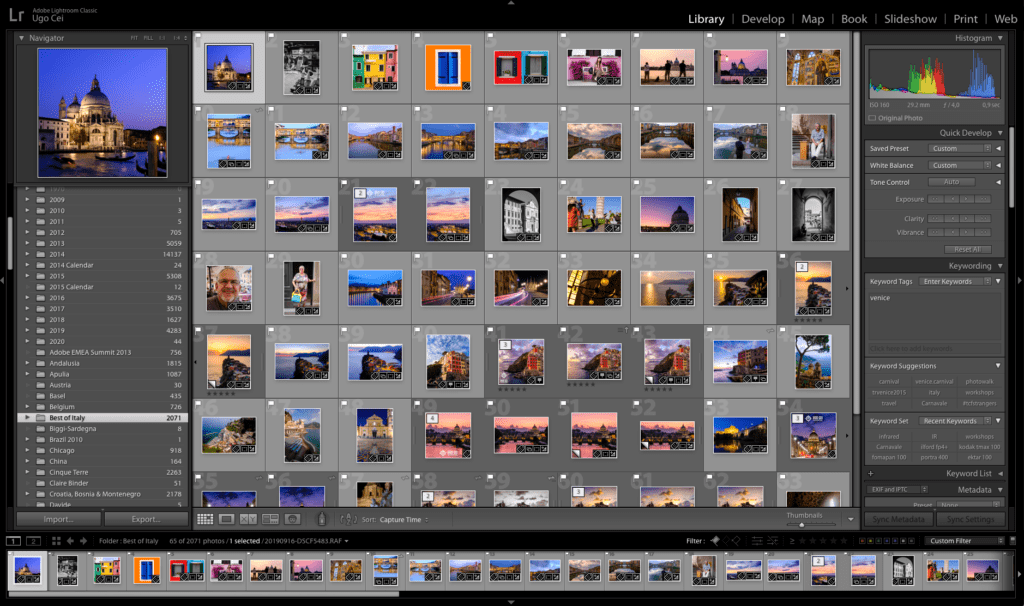
- Importing: Use the Library module to import photos. You can choose your source, apply metadata, and decide on file handling preferences.
- Organization: Utilize folders, collections, and keywords to keep your photos organized. Collections are especially useful for grouping related photos without moving them on your hard drive.
Develop Module

- Editing Panel: The Develop module is where most of your editing happens. You’ll find a range of tools on the right panel where to enhancing your photos in Adobe lightroom, including basic adjustments, tone curves, and detail enhancement features.
- Toolbar: The toolbar at the top includes essential tools like cropping, spot removal, red-eye correction, and more.
2. Importing and Organizing Photos
Efficient photo editing starts with proper organization. Here’s how to import and organize your photos effectively:
Importing Photos
- Source Selection: Choose the source of your photos, whether it’s a camera, memory card, or hard drive.
- Import Settings: Decide whether to copy, move, or add your photos to the catalog. Apply develop settings or metadata during import if needed.
Organizing Photos
- Folders: Reflects your file system structure and allows you to navigate your photos as they are stored on your computer.
- Collections: Create collections to group photos for specific projects or themes without altering their storage location.
- Keywords: Tag your photos with relevant keywords to facilitate easy searching and filtering.
3. Basic Adjustments
Basic adjustments are the foundation of photo editing in Lightroom. These settings help correct exposure, contrast, and color balance.
Exposure and Contrast
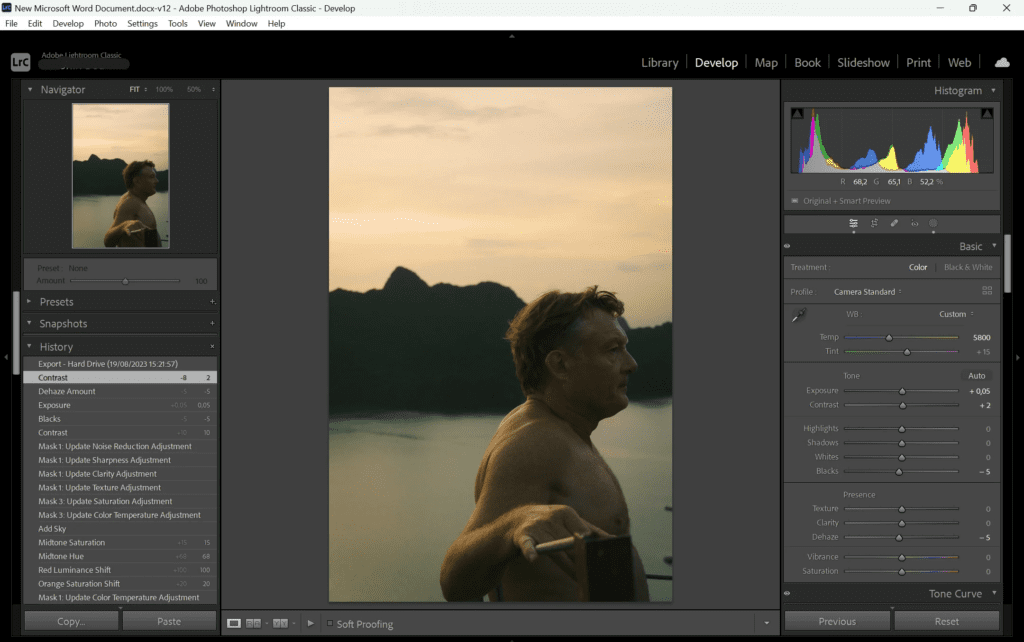
- Exposure: Adjust the overall brightness of your photo. Keep an eye on the histogram to ensure that highlights and shadows are balanced where it will enhancing your photos in Adobe lightroom
- Contrast: Increase or decrease contrast to enhance or soften the difference between light and dark areas. Higher contrast adds depth, while lower contrast can create a more muted look.
White Balance
- Temperature and Tint: Use the temperature slider to adjust the warmth or coolness of your photo and the tint slider to fix green or magenta color casts. Proper white balance ensures that the colors in your photo look natural.
Clarity, Vibrance, and Saturation
- Clarity: Enhances midtone contrast, making textures and details pop. Use it judiciously to avoid halos around objects.
- Vibrance: Boosts the intensity of more muted colors without oversaturating already vivid hues, maintaining a natural look.
- Saturation: Adjusts the intensity of all colors in the photo. Be careful with this slider as it can easily lead to oversaturation.
4. Advanced Tone and Color Adjustments
Beyond enhancing your photos in Adobe lightroom, Lightroom offers advanced tools to fine-tune tone and color.
Tone Curve
- Point Curve and Parametric Curve: The tone curve allows you to adjust the brightness and contrast of different tonal ranges in your photo. Use the point curve for more precise control and the parametric curve for general adjustments.
HSL/Color Panel
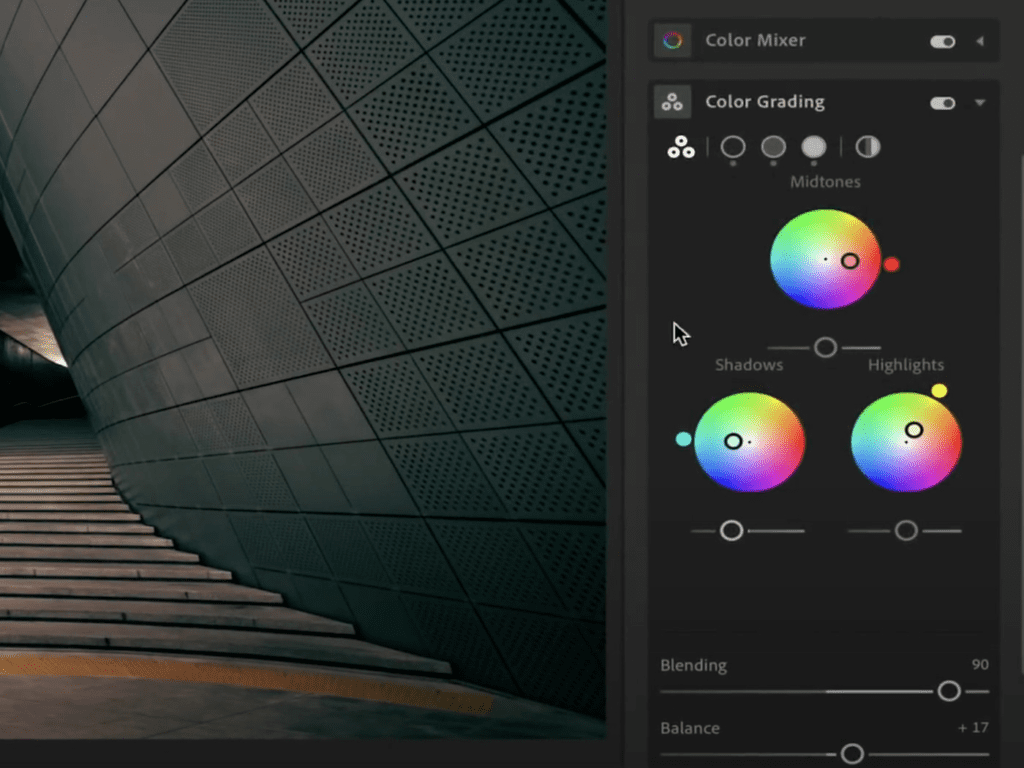
- Hue, Saturation, and Luminance: Adjust the hue, saturation, and luminance of individual colors. This is useful for enhancing specific colors or creating a stylized look.
- Targeted Adjustment Tool: Click and drag directly on the photo to adjust the hue, saturation, or luminance of specific colors.
Split Toning
- Highlight and Shadow Colors: Add color tints to the highlights and shadows of your photo. This technique is great for creating mood or adding a vintage look.
5. Detail Enhancement
Detail enhancement can bring out the sharpness and clarity in your photos.
Sharpening
- Amount: Controls the intensity of sharpening.
- Radius: Determines the width of the area around edges that will be sharpened.
- Detail: Enhances fine details in the photo.
- Masking: Use this slider to limit sharpening to the edges of objects, preventing noise in smooth areas.
Noise Reduction
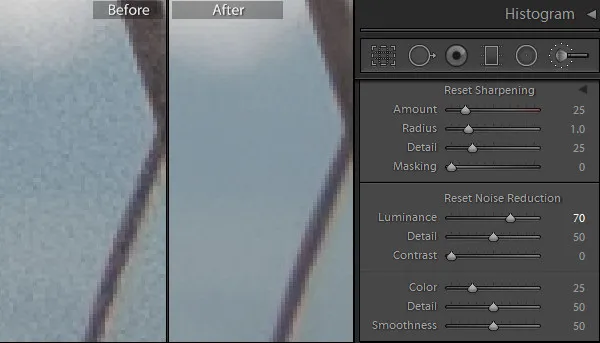
- Luminance: Reduces graininess caused by high ISO settings, especially in low-light conditions.
- Color: Removes color noise, which often appears as random color specks in your photo.
6. Lens Corrections and Transform
Correct lens distortions and perspective issues to ensure your photos look natural and well-proportioned.
Lens Corrections
- Profile Corrections: Enable profile corrections to automatically correct distortions and vignetting based on your lens profile.
- Manual Adjustments: Adjust distortion, vertical, and horizontal perspectives manually if your lens is not supported or you prefer a customized correction.
Transform Tools
- Guided, Auto, and Manual: Use the transform tools to correct perspective issues, such as converging lines in architectural photos. The guided tool allows you to draw lines along elements that should be parallel or vertical.
7. Creative Adjustments
Add a creative touch to your photos with Lightroom’s special effects and filters.
Vignetting
- Post-Crop Vignetting: Apply a vignette effect to darken or lighten the edges of your photo, drawing attention to the center.
Grain
- Adding Texture: Simulate film grain to add texture and character to your photos. This can be especially effective in black and white images.
Dehaze
- Reducing Haze: Use the dehaze slider to cut through haze and enhance clarity, particularly useful for landscape photos with atmospheric conditions.
8. Using Local Adjustments
Local adjustments allow you to apply edits to specific areas of your photo without affecting the entire image.
Adjustment Brush
- Selective Adjustments: Paint adjustments onto your photo using the brush tool. Adjust exposure, clarity, saturation, and more for targeted areas.
Graduated Filter
- Linear Adjustments: Apply changes in a gradient fashion, ideal for enhancing skies or creating gradual changes across the photo.
Radial Filter
- Circular Adjustments: Apply adjustments in a circular or elliptical area. Useful for creating vignettes or spotlighting subjects.
9. Presets and Profiles
Presets and profiles can streamline your workflow and add consistent looks to your photos.
Using Presets
- Applying and Customizing: Apply predefined adjustments quickly with presets. Lightroom offers built-in presets, and you can create or import custom presets.
- Batch Processing: Apply presets to multiple photos simultaneously to maintain a consistent style across a series.
Camera and Creative Profiles
- Color and Style Adjustments: Profiles change the overall look of your photo without altering slider settings, allowing for additional adjustments on top.
10. Exporting Your Photos
After editing, prepare your photos for sharing or printing with the appropriate export settings.
Export Settings
- File Format and Quality: Choose the appropriate file format (JPEG, TIFF, etc.) and quality settings based on your intended use.
- Color Space: Use sRGB for web and screen display, Adobe RGB for printing.
- Resize and Sharpening: Resize your photos to desired dimensions and apply output sharpening if needed.
Watermarking and Metadata
- Adding Watermarks: Protect your photos with a watermark during export. Customize the position, size, and opacity of your watermark.
- Metadata: Include or exclude metadata, such as camera settings and location information, based on your preferences.
Enhancing your photos in Adobe Lightroom
11. Workflow Tips and Tricks
Enhance your Lightroom workflow with these additional tips.
Batch Editing
- Sync Settings: Synchronize settings across multiple photos to save time. This is useful for applying consistent edits to a series of similar photos.
Snapshots and History
- Tracking Changes: Use snapshots to save different versions of your edits, and the history panel to navigate through your changes and revert to previous states.
Virtual Copies
- Experimentation: Create virtual copies to explore different edits without duplicating the original file. This allows you to compare various editing approaches side by side.
12. Continuous Learning and Experimentation
Stay updated with Lightroom’s latest features and continually experiment to refine your skills.
Staying Updated
- Software Updates: Adobe regularly updates Lightroom with new features and enhancements. Keep your software updated to take advantage of these improvements.
Online Resources
- Tutorials and Communities: Explore online tutorials, blogs, and forums to learn new techniques and get inspired. Websites like Adobe’s own Lightroom resources, YouTube, and photography communities offer valuable insights.
Practice and Experimentation
- Honing Your Skills: The more you use Lightroom, the more comfortable you’ll become. Experiment with different tools and settings to develop your unique editing style.
Conclusion
Adobe Lightroom is a versatile and powerful tool that can transform your photography. By mastering its features and continually refining your editing techniques, you can elevate your photos and develop a distinctive photographic style. Use this guide as a starting point and keep exploring Lightroom’s capabilities to take your photo editing to the next level. Whether you’re adjusting exposure, enhancing details, or applying creative effects, Lightroom offers endless possibilities to enhance your images. Happy editing!
This comprehensive guide covers a range of Lightroom features and editing techniques. Feel free to explore each section in detail and experiment with your own photos to get the best results.


